Pages

Wednesday, April 30, 2014

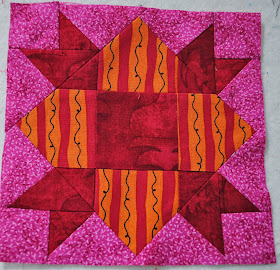
Spider Legs

This is block #82  from the FW book.  Don't worry, I am nearing the end of the blocks I have cut out so my recent splurge of posts will stop.  If you have been following along from the beginning, you should have about 20 blocks left to go.  I will be doing some substitutions when we get down to the final 10.  Let's face it - no one is going to know if it actually came from the book or if you picked an easier block.  Also, with over 100 blocks, no one is going to know if you repeated an easy block except for you.

This block is NOT an easy one.  The pieces are quite small!  Once again I am changing the way this block is put together.  Does a block have the same name if you put it together differently?  We will be making some flying geese that finish at 3/4" x 1 1/2 instead of the trapezoids in the pattern.  It looks like a crazy mess of pieces, but trust me- they will all fit together.

Cutting Block #82
Light-  
1- 2" square
4 - triangles w/1 1/4" strip and companion angle (CA)
16- triangles w/ 1 1/4" strip and easy angle (EA) 
Dark
4- 2" squares
8- triangles w/1 1/4" strip and CA
8- triangles w/1 1/4" strip and EA
4- triangles w/ 2 1/2" strip and CA

That was the hard part. Now for the sewing-

Make 8 flying geese dark as the larger triangle; Make 4 flying geese with the light as the goose (larger triangle).  These should measure 1 1/4" X 2".  Use the picture if you need help on how to square them up.  Put the 1 1/4" line at the top and the bias line (45 degree) on the seam line.  

I always press the first sky (small triangle) toward the goose, and the second sky triangle away from the goose.  I think this helps it to lay flat. These are super small pieces, so you may want to press them all open. If you aren't comfortable with your seam allowance, you can always use a 1 1/2" strip and square them up to the size needed.    

Join the geese in pairs.  Join the remaining 4 geese with the corner squares


 Add a large dark triangle to both sides of 2 of these units; join the remaining 2 units with the light center square.

I pressed the final 2 seams open to reduce bulk.  I was amazed how well this block lined up for me.  

Square up the block  to 6 1/2" taking care to keep the center square in the center.

Did you make it to the end?  Now look at block number 110 from your book- It is the same block with the exception of the larger triangles.

Edited:  I did block #110 the same way and it came out too large.  With this block it isn't a problem because there aren't any points to chop off on the edge.  I will modify the sizes a little smaller with block #110 (1 7/8" center square).

Tuesday, April 29, 2014

Modified Garden Path (#43)

You know I am always looking for an easier way.  This block is no exception.  If you want to use your templates from the Farmer's Wife book, feel free to do so.   My block is slightly different.

Cutting:
Assorted Colors:
8- assorted squares 1 1/2"
8-assorted half squares-1 1/2" strip cut with easy angle (EA)
1- 1 1/4 X 18" strip
Background:
20 half squares 1 1/2" strip cut with EA
4 half squares 1 3/4" strip EA(where I have the pink)

Sew four 1 1/2" squares together to form a 4-patch; Add the larger background half squares.  Square up if necessary leaving 1/4" margin at each of the points. Next sew the 1 1/4" strip around the unit is log cabin fashion.  Square up to 4 3/4" (about 1/8" off of each side)

Make 8 half squares with the assorted half squares and background fabric; Add the remaining back ground triangles and the squares to the units.  Square up to 3" finished half squares with the EA if necessary.

Join with the 4 3/4" unit to complete the 6 1/2" square.

I am sorry I don't have more pictures, but I must have been in too big a hurry.  Actually I think I took them but I am not sure where the memory card is.


Monday, April 28, 2014

Mudgee, NSW Australia

As my daughter prepares to travel and all the paperwork that never seems to end, it is fun to use the internet as a resource of information.  We have explored the school website.  They have lots of different options than we have in the United States.  Sydney is so excited to see that the public school has uniforms.  This is helpful with our packing.   The thing that has her most excited-
\


Yep - Mudgee has a library (photo from Google).  I am sure getting a library card is one of the things at the top of her list.  If you want to look around Mudgee check out their website.  There is a lot of information there.  It looks like she will be arriving in time for the wine festival in September.

Do you think there are any quilters in Mudgee?

Morning & Weathervane

I am trying hard to keep the farming going until the end.  Don't feel overwhelmed by my series of posts.  I have had these cut out for quite awhile I just didn't find the time to put them together.

These are FW blocks #57 and #100.  These are essentially the same block except number #100 has a different color center square.  I am sewing them differently than the instructions- feel free to stitch them with your own method.  It is sad to say the as this project goes on, I am getting less persistent about accuracy.

Cutting Instructions for Block #57
Color #1
2 - 2 1/2" squares
1 - 2 1/2" X 6 1/2"

Color #2
8 - half Squares cut with Easy Angle (EA) and 1 1/2" strip
4- Quarter Squares cut with Companion Angle (CA) and 1 1/2" strip

Color #3
8- Quarter Squares cut with CA and 1 1/2" strip
4 - 1 1/2" Squares

Cutting Instructions for block #100
Color #1
4 - 2 1/2" squares

Color #2
Same as for block #57 EXCEPT ADD
1 - 2 1/2" square


Color #3
Same as for block #57

Piecing:

For block #57 - join two 2 1/2" squares of color 1 with one 2 1/2" square color 2.

For both Blocks:

  1. Join a half square triangle to both sides of color 1 squares.  Join those units with the 2 1/2" X 6 1/2" piece.  Square up to 4 3/4".  This is a little tricky.  Take extra care to get the sides spaced evenly.  I did not do this well on my first block and my pieces didn't line up.
  2. Join the Color 2 & Color 3 quarter square triangles together; 
  3. Join the remaining quarter square triangles to the half square triangles;  Add the 1 1/2" square to this unit (take not 2 of these go on the left side of the geese unit, and 2 go on the right)
  4. Join the units made in #2 & #3 to make a large triangle - Square up to 3" finished half square with the Easy Angle
  5. Join the squared up triangles to the 4 3/4" square to complete the 6 1/2" blocks


My pieces didn't line up well in the first block because I didn't square it up well.


  The pieces lined up much better in this block.  The only seams I pressed open were when I joined the larger triangles to the 4 3/4" unit.

I can't wait to see all your new blocks! I have 4 more ready to pieces then I will have to start cutting out more.

As a side note, you could sew the center as a 9 patch and square it up to 4 3/4" - it might be easier and make things line up better for you.


Sunday, April 27, 2014

Wild Geese

I was surprised how easily this block went together.  I made an error when cutting, so I had to square up my pieces.

Background (yellow)
4- 2" squares
4- triangles cut with Companion Angle (CA)1 1/2" strip

Color 1 & Color 2(Darks)
8- triangles cut with Easy Angle (EA) 1 1/2" strip
2- triangles cut with CA 1 1/2" strip

Color 1 & Color 2 (Lights)
2 - triangles cut with CA 2" strip


Sewing:

  • Sew the small dark triangles to the background triangles AND squares; square up to 1 1/2" x 2 1/2"

Because I cut my triangles too large, I had to trim off a lot of excess on my flying geese.  I used this ruler to trim down my units.  I felt the lines on the ruler were very helpful in squaring up my units correctly. I will be using this ruler more frequently.  Perhaps that is why this block went together so well.

  • Sew the larger dark triangles together to make the center hourglass unit.    Square up to 2 1/2" if necessary.


  • Sew the units together in rows

I pressed the center row toward the hourglass unit, and the other two rows I pressed toward the larger triangles.

 Join the 3 rows together to complete the 6 1/2" block.  I pressed the final 2 seams open.

I don't know how big you want your quilt, but if you have been following along with me, you probably have enough blocks for a twin size quilt.  If you are going for a queen size quilt, hang in there for more blocks to come.

Saturday, April 26, 2014

Country Path (#24)

Country Path
Cutting:

Background:
2 - 1 5/8" squares
8 - triangles cut with Easy Angle (EA) 1 5/8" strip

Assorted Colors:
4- 2" squares (corners)
12- 1 5/8" squares
8 - triangles cut with EA 1 5/8" strip


  1. Sew the 8 light and dark triangles together on the short edge in pairs; join with the 4 - 2" squares as illustrated.  Square up to a 3" finished half square with your EA
  2. Place the 2 - 1 5/8" squares on the 2 1/2" square.  Sew on the diagonal (using the stitch and flip method) to make the center square  
  3. Join the remaining squares (1 5/8") around the center square.  Square up the center unit to 4 3/4"
  4. Add the pieced triangle units to complete the block.  Square up to 6 1/2" if necessary.
This block went together so quickly that I forgot to take more pictures.

Friday, April 25, 2014

Corn and Beans

This block seemed sort of intimidating at first.  I chopped off a few points in mine, but it wasn't bad enough to have a do-over.

#22 Corn and Beans

Cutting:

Background:
2 - Triangles 1 7/8" strips with Companion Angle (CA)
4- Triangles 2 1/2" strip with Easy Angle (EA)
20- Triangles 1 1/2" strip with EA

Color 1: (Green)
12- Triangles 1 1/2" with EA

Color 2: (Red)

2- Triangles 1 7/8" strip CA
4- Triangles 1 7/8" strip EA

  1. Sew the triangles cut with the CA together to form the center hourglass unit. Press toward the dark
  2. Sew a background triangle on both short edges of 4 of the color 1 triangles; join with the center hourglass unit
  3. Add the 4 Color 2 triangles to the unit and square up to 4 3/4" if necessary
  4. Join the remaining background and color 1 triangles in a line alternating colors; Add the remaining background triangles to the 4 units.  Use your EA to square up to 3" finished half square
  5. join the pieced triangle units to the completed center to make a 6 1/2" square.
If you look at the last 2 blocks, they are both essentially square in a square with lots of pieces.  We will continue on this theme with the next few blocks also.

Thursday, April 24, 2014

Cats & Mice - #17

I tried this block once before, but it didn't go well. This time it went together perfectly.  I guess I must have learned a  thing or two the first time around.

I did this as a two color block.
Cutting:
Background (white)
Cut:
4- triangles with Companion Angle (CA) and a 2 1/2" strip
4- triangles with Easy Angle (EA) 1 1/2" strip
8- triangles with CA - 1 1/4" strip

Color (Red)
5- squares 1 7/8"
8- triangles with CA- 1 1/4" strip

Sewing

  1. Make your hour glass blocks by sewing a pair together the triangles cut from the 1 1/4" strip; Press this seam open.  I recommend using a short stitch length
  2. Sew the pairs together.  I used the square up ruler to square up to 1 7/8", then I pressed the seam open.  This is the easiest way for me, but feel free to use your own method if it works for you.  Line up the center seam on the ruler with the seam you pressed open, and line up your stitch line with the 1 7/8" line.  Press the seam open.
  3. Join the 4 hourglass units to four of the squares (press toward the square)
  4. Take 2 of those units and join the larger triangles to each side (press toward the large triangle); Join the remaining 2 units with the remaining square (press toward the center square)
  5. Join the 3 units together matching seams; Press these seams open
  6. Add the remaining 4 corners triangles - press toward the final triangles.  
  7. Square up to 6 1/2"


Wednesday, April 23, 2014

Resuming the farming - Silver Lane (#79)

It is baseball season, and I am not getting a whole lot of sewing done.  I have about 10 FW blocks already cut out.  These will work well for the little snippets of time that I have available this spring.  I am ready to take this project to the finish line.
 By this time in the project, you are experts at half square triangles - especially the 1" finished variety.  I did my block very scrappy because those were the pieces I had.  The block in the book has 5 colors.  Please use your own colors, but for clarity, I am going to give the instructions by my colors.

Cutting:
White (background)

  • 4 - 1 1/2" squares
  • 4 - 1" finished half squares
    •  1 1/2" strip with Easy Angle
  • 4- Quarter Triangles 1 1/2" strip with Companion Angle
Aqua
  • 8 - 1 1/2" X 2 1/2" 

Purple

  • 4 - 1" finished half squares 1 1/2" strip with EA
  • 4- 1 1/2" X 2 1/2" rectangles
Green
  • 4- 1 1/2" squares
  • 8- 1" finished half squares 1 1/2" strip with EA

There are 40 pieces, so I better get started.

Use the take away method described here to trim off the corners of the aqua rectangles.    They are mirror image, so make sure you have wrong sides together if you are cutting in pairs.  The take away method is talked about in several other posts too, so you can always type in "take away" in the search box if you forget how.  Now that you have these cut, lay out all your pieces to make sure everything is going the right direction.

Sew the 4- purple/white half squares together and square up to 1 1/2"; join in pairs, then join into a 4-patch to form a pinwheel.  I pressed all these seams open.   Add a 1 1/2" x 2 1/2" rectangle to the left and right sides of the pinwheel- Press toward the rectangles.   Add a 1 1/2" square to both ends of the remaining 2 purple rectangles- press toward the rectangles, then join with the pinwheel unit.  Check to make sure it measures 4 1/2".

Join the green squares to the blue trimmed rectangles.  Add these to the white quarter triangles to make the side units- these should measure 1 1/2" x 4 1/2".  Join the remaining 4 squares to the left and right side of 2 of these units.  It is very important to sew these accurately to get everything to fit.  Make sure your aqua rectangles are exactly 2 1/2" long before you do the take away method.  If you find you are having trouble getting things to fit, Use 1 1/2" squares and use the stitch and flip method.  This may work better for you since the pieces are so small.

Add these to the pinwheel unit to complete the block.


Did you make it to the end?

Monday, April 14, 2014

We have a City!!

I know I have been rather impatient, but we have a city for my daughter.  My daughter will be traveling to the city of Mudgee in NSW, Australia this summer.  She will be there for about 11 months.  We were able to look it up with Google and see what her school will look like and take a bit of a virtual tour.  Mudgee is about 4 hours north and west of Sydney Australia.  It is a smaller community that is known mostly for farming (grapes and wine is the main crop).

Upon research I found some great images of Mudgee.


Hopefully she will get to the "The Drip" which is a little northeast of Mudgee.  Mudgee isn't too far from several forests.
Picture

She will never get tired of looking at the landscape -


I am so excited for her!


Retreat Recap

I greatly needed my weekend with friends.  It was great to have some sewing therapy.  I started by sewing this new quilt on Friday.  I worked on sewing the last 4 border pieces on this UFO.  It is ready to quilt - Yeah!  These 4 lonely sampler blocks are no longer in a box.  

I also worked on completing the sampler quilt that seems to have been living on my design wall for way too long.  It didn't take me long to pick the border fabrics for this one.  I am pleased with how the border fabric brings out all the colors in the sampler blocks.

I moved on to something new after finishing....(not really finished, but they are ready to be quilted), two items from the UFO parade.  I was a few days late in completing this for candy club, so I wanted to post it on my blog.  I used Moda Linen Mochi Dot for the background.  I have been seeing so many quilters playing with linen that I wanted to give it a try.  I love the earthy texture and elegant feeling it gives the table runner.  The candy pack is from French General, and I added some 2 1/2" square from my stash to make it larger.
I am halfway done with my goals for April.  It is a really good start at checking some more things off the list.  My pile of projects to get quilted is starting to add up.

Thanks for visiting, and stop back at Judy's to see what others are working on this week.


Friday, April 11, 2014

Happy finish!

I love these fabrics.  Such a beautiful quilt.  It is a great weekend retreat with friends at the library.

Monday, April 7, 2014

April Goals/March Recap

I fell a little short on my April goals.  I still need to quilt my pillows and bind 3 more quilts from January.


April starts baseball/softball/track stuff so that doesn't leave much sewing time.  I have a retreat this weekend which should help me to get a few things done.

This is what I will be working on in April -


  1. Quilt 2 more customer quilts.
  2. Put together the blocks for Lewis and Clark quilt.  I did manage to get the alternate blocks made in March
  3. Put borders on my 4-patch quilts set on point.
  4. Put the last border on the Churn dash blocks
  5. Bind the remaining 4 quilts from January
  6. Put together a new project that I cut out
  7. Quilt the pillows/runners that I made in February (after number 1-4 is completed)
Focus!!  I seem to be having some trouble with this lately.

I am ready for borders for this old scrap quilt.  I made the sashing in October.  I put it together earlier this year.  Now I am having some trouble picking the border fabrics.  I may just go with large bricks of several fabrics.  It is so large that I have to gather it in the middle to make it fit on the design wall.  I think it will be about 118" with borders.  Do you have a border preference?

We are still waiting (rather impatiently) for a city assignment for my daughter.  I don't know why this is harder than waiting for the country assignment.  I did manage to put together this cute little mug rug as a test block. The pear pattern is from Fig Tree quilts.  I love how it turned out.   


Stop over Judy's to see what others are working on on this week.