Monday, March 26, 2012

Retreat Success

I made much progress this weekend.  What could be better than 3 days sewing with friends?  It would take something fabulous.  Well, it wasn't all sewing, we did have a little adventure at a quilt shop.  We even a had a friends helping friends experience when Ellen bought two washcloths from Nancy so she would have enough funds to buy the fabric she wanted.  Almost everyone made the strippy quilt (1600" quilt), but everyone had a different vision and they all turned out well.  The quilt below is Ellen's.  I just love that blue fabric that she put between the rows.  After she had her strippy sewn, she cut it apart and add the columns.

 On my design wall is another oldie.  This one was put away long ago because I was having issues with the border.  It was a mystery quilt and I sort of lost interest with my color selections.  It will probably be hanging just like it is now next week, but it will get finished eventually.
 What did I work on with 3 full days of sewing?  Backings and more backings!!!  This tub contains all the quilts that I have finished and the matching backing.  I hope to have a week full of quilting.  Don't get me wrong, I know I won't get all these done this week, but each one is a step closer to clearing up all my UFOs.  I think I must be on the 100 step program.
Check back with Judy to see what others are working on this week.

Thursday, March 22, 2012

Northern Lights

This is another super easy one! 

#61 Northern Lights

Color 1 & 2
  • 4 - 2" squares each
  • 2 - 3" finished half squares (3 1/2" strip and easy angle)

If you aren't working from scraps, you can cut strips (8"-9") instead of squares.  I am still working out of the scrap bucket, so I don't have many strips.  I really liked that green for the half squares, but I couldn't find any more for the 4 patches so I had to go with an alternate color.

Join the squares in 4- patches and join the half squares.  Check your measurements to make sure they are 3 1/2"; join the 4 blocks to make a 6 1/2" Northern Lights block.
I'm not sure how many blocks this adds up to, but I think we are almost 1/3 the way done.  Do you know what that means?  We are almost out of blocks with big pieces!!

Jelly Flops

The neutral jelly flops are cut! Subee suggested I hang them on a drying rack to see how they looked (and to display the colors better).  Let's just say 80 yards of fabric stress tested the drying rack.  I was going to carry it upstairs to get a better picture, but I realized that couldn't happen.

This is one side of the drying rack...

This is the other side...

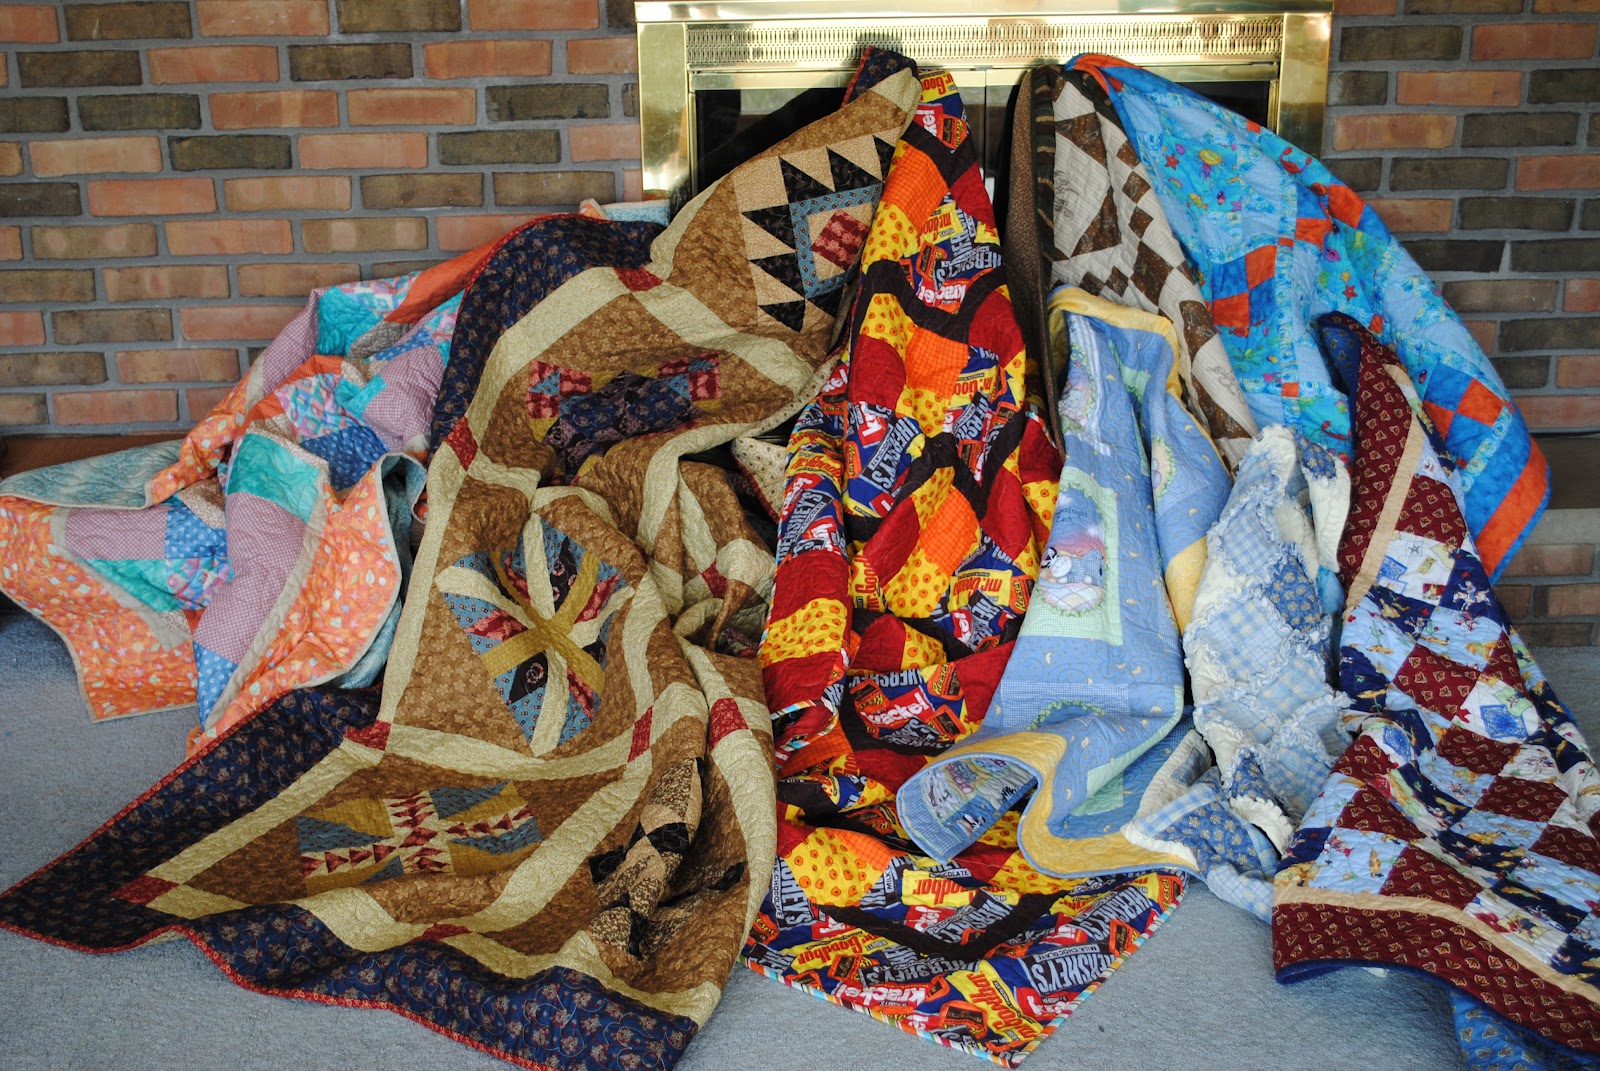
And here they are all folded up and ready to travel.  I decided it would be easier to take the box to the library where there are lots of tables and open area to do the swapping.  The red plaid...well that was handy (laying on the floor), so I grabbed it before I had a land slide!! 

I have most of my stuff loaded for a weekend of sewing.  I didn't get any sewing done of quilt backings this week, so that is what I will be working on at the retreat.  It doesn't sound too exciting, but it is necessary.  I can't really judge how long this will take, so I packed 3 quilts that just need borders.  The best part about these weekends is spending time with friends, so it really doesn't matter what I am working on.  Well, the food is great too!!

Puss In the Corner

#71 Puss in the Corner

 
Cutting:
Dark:
  • 4- 1 1/2" finished half squares (2" strip & easy angle)
  • 1- 3 1/2" square
Background
  • 4 -1 1/2" finished half squares (2" strip & easy angle)
  • 4- 2" x 3 1/2" rectangles

 
Sew the half square together first and press toward the dark.  Join in a 9 patch fashion.  Press away from the half squares (toward the rectangles) and press toward the the rectangles on the center section.  It probably took you longer to pick out your fabrics than it do to sew this one.  Sorry for the bad pictures :-(


Tuesday, March 20, 2012

#109 and #6

Windows and the Big dipper.  These are just simple hourglass blocks.  These are so similar that I decided to post them together.

#109 Windows

Cutting:
  • 2 dark/2 light triangles with a 2" strip and Companion Angle (CA)
  • 2 - 2" x 3 1/2" dark
  • 2- 2" x 6 1/2" dark
Join each both light triangles to the dark triangles to make an hourglass block.  Add the dark 2" x 3 1/2" dark strips to the top and bottom (press out); Add the dark 2" X 6 1/2" strips to the sides.

#6 Big Dipper
  • 8 Dark/8 Light triangles cut with CA and 2" strip
Join each light to a dark triangle.   Make sure you sew them all the same.  I pressed toward the dark for the hour glass blocks, and I pressed the seams of the 4 hour glass blocks joined together open.


The first day of spring and it feels like summer where I live.  I am enjoying the record setting temperatures, but I know it can't last.  My flowers are blooming  and they are beautiful this year.

Monday, March 19, 2012

On the wall...

Well some would say I am a little off the wall.  Honestly, I have stuff scattered on every surface currently.  I did a major sort this weekend.  I am remaining committed to clearing up a lot of UFOs this year.  I haven't had a lot of finishes to report so far, but I have a lot of quilts getting a lot closer.

I wanted to show you my bright FW blocks that I have completed so far.  The plan is make a baby quilt out of every so many block.


Not sure why blogger turned this picture, but this is the quilt I was working on here.  It is a version of the 1600" quilt.  I took apart some of the spots where there were big blobs of color.  I also took off the excessive length where I flawed the math.
Organization.  This weeks project is to piece the backings for this pile of quilts.  I have another pile that has all the backings ready to go.  Some of these are recent completions, some of these are old projects. 

If I don't get these done, I can always work on sewing the backings during the next retreat.

Don't forget to check Judy's blog to see what other have on the design wall today.

Friday, March 16, 2012

#39 Friendship

This is a really easy block, so you should have it together in no time.

Cutting: 
Colors 1-4
  • 1 - 2" square
  • 1 - 3" finished half square (3 1/2" strip with the easy angle)
Color 5
  • 4 - 3" finished half squares (3 1/2" strip with the easy angle)


Sew the 4 half squres together.  Check to make sure they measure 3 1/2".  Press 2 opposite half squares toward the center; and the remaining 2 toward the outside.

 Place a matching 2" square on the inside corner of the 3 1/2" half square.  Sew corner to corner and trim 1/4" from the seam.  Press the same direction as in the previous step.
Sew the 4 pieces together to complete the block.  I pressed the final seam open, but you may just want to press it to the side.

Whirlwind

Sort of like how my life feels!  all kidding aside, I better get moving with posting the March blocks.  This is #103 from the FW book

Cutting
Color 1
  • 4 pieces 2" X 5"
  • 1 - 3 1/2" square
Color 2
  • 8 triangles cut with the easy angle and a 2" strip
This is a different way to piece the block than the book shows.  This block has numerous ways it can be put together. 

Trim away triangles on the 2" x 5" rectangles (you can once again use 2" squares and sew corner to corner if you don't like this method).

Attach all (8) triangle pieces to the trapezoid pieces.  These should measure 2" x 5"  Press these units to one side.  Check your measurements and square up if you need to.  For this block we are going to do a partial seam.

Align pieces and begin sewing at the edge.  Stop sewing when you get about 1/2" from the edge of the square.  It doesn't have to be exact, but I placed a pin there so I didn't forget to stop.  Some quilters leave a larger area unsewn - it is a personal preference.

 Press toward the center square
Keep adding rectangles going around the square.  Press each rectangle toward the center square.  When I get to the 3rd rectangle I usually pin the loose part back so that I don't accidentally get it caught in the seam.

Now that you have made it all the way around, you can finish your first seam.  Pin the the remainder of the rectangle to the last piece added to finish the seam and complete the block. 

 
My design wall is looking empty.  It seems like a good time to put all my blocks up and see how they look together.

Whirlpool

This is FW block number 102.  I am not following the instructions on this block either.  Feel free to construct the block your own way.

Cutting:
Color 1:
  • 4 triangles cut with the companion angle and a 2" strip
  • 4 pieces 2" x 3 1/2"
Color 2:
  • 16 half squares cut with the Easy Angle (2" strip)

Once again, we are going to be making trapezoids out of the rectangles.  Cut the 4 rectangles into trapezoids as illustrated.  Once you cut one side, rotate the fabric and cut the other side.  Take the 4 triangles cut with the companion angle, and add a half square to each side making (4) 2" x 3 1/2" flying geese.  Add the remaining triangles to the trapezoids.

*If you don't like the cut-away method, feel free to use 2" square instead and sew corner to corner. You will get the same end result. 


 Press the trapezoid shapes to one side (or open if you prefer)


Arrange the geese and trapezoid units as shown and sew together in a 4 patch fashion.  Make sure you check your units and square up if necessary.  After you join the rectangles they should measure 3 1/2" X 3 1/2".
Hope you enjoyed this block. I think it is a fun and attractive block.


Thursday, March 15, 2012

Ribbons

That's what the FW book calls this block (#74).  I think this one has the most pieces so far.

Cutting:
  • 4 - medium 2" X 3 1/2"
  • 4 - dark 2" x 3 1/2"
  • 16 half squares cut with a 2" strip.  (you can use 2" squares for this is you wish)
I know most of you just look at the pictures, so I am going to say this first thing.  The angles on the darks and the mediums are REVERSED!  You can not turn them to get the angles going the right way.  To cut them the same way easily, cut the mediums with all fabrics face up and the darks with all fabrics face down.

See how the stitch line (the dotted line) is right on the corner and the bottom of the fabric is lined up with another line.  Use this as your guide and cut away the corner triangles.  Flip your fabric and cut in the same manner.  Do all 8 of the 2" x 3 1/2" rectangles; cut one color with fabric face up and the other color with fabric face down.  Now sew all 16 of the triangles on the corners.  I recommend no steam on your iron.  Press one color (blue) toward the trapezoid shape and the other color (white) toward the triangles.  After adding the triangles, these should still measure 2" x 3 1/2".  I had to square mine up to get this measurements

Pin the opposite pieces together and join.  Since you pressed opposite ways, they should snuggle right together.  I pressed this center seam open because of the bulk.  After pressing it should measure 3 1/2".  Check your measurements!  Join the completed units together to make a 6 1/2" block.


Wednesday, March 14, 2012

Flaw in the Math

Potato Chip quilts, aka 1600" quilts...whatever you want to call them.  This post really intrigued me with the variations.  It also sent my math brain to kick into high gear.  I started thinking about a container of leftover binding strips that I had on the shelf.  I knew it was loaded with lots of bright colors from charity quilts past, so I sprang into action.  I calculated how long I wanted the quilt and how many strips that would take to get there, and I multiplied by the width to get my total inches I needed.  What I failed to think about, was that every time I would fold it in half, the number of strips for the length would double (2, 4, 8, 16, 32).  I had calculated that I wanted it 26 strips long.....UMMM....That isn't even possible.  The result was that I had the correct width, but a really long quilt that was out of proportion.

I am still a little baffled how the big blobs of red and pink arranged themselves.  I took care to evenly space the colors, however, they ended up very near each other.  I will be taking the extra rows off because it isn't proportional.  And because it would always bug me, I will be separating the red rows.  The extra rows that I am taking off will be used as part of the backing.  It is about 29" wide which is a good size for a baby quilt.  Eleanor plans to jazz it up with a little applique.

The sad part is, the leftover binding strips container still looks full.

It's bright and sunny here today.  Enjoy your day.  

Tuesday, March 13, 2012

Neutral Bliss

Another big box came today to go with the other fabrics I purchased recently.  This one is full of Neutral Bliss! This is 70 different one yard cuts of neutral fabrics from cream to tan to golden.
Those few fabrics on the right were just a little stash enhancement.  I do realize that the next jelly flop swap isn't until June, but I couldn't wait that long.  And they say quilting takes a lot of patience...I admit that I have none!!   This will give me plenty of time to get them cut and swapped.  I am just thankful I didn't have to cut the one yard pieces.
Ellen had a very good point that I never really thought about.  The reason I am always short on neutrals is because they don't say, "you are just so beautiful that I must have a little of you and take you out of the store".  Let's face it, when you go into a quilt shop you don't look at the neutrals unless you need them for a specific project.  You don't say..."I love that shade of cream, I need to buy some."  Now if it was a red or green with a specific pattern, absolutely.

Monday, March 12, 2012

Design Wall Monday

I should have been working on quilting and getting the instructions ready for more FW blocks......but....I wanted something new on my design wall.  I worked really hard and I have the brown/aqua quilt in rows.  I took it down because I like to pin the rows together while watching TV with the family.
I looked around and found another basket filled with pieces so I put them up on the design wall.  I wasn't really sure where I had left off with these flannel scraps when I boxed them up.  I discovered that I had plenty of 4 patches for a lap quilt, but I no longer have the plaid flannel for the alternate blocks.  I was not up for the challenge of figuring out what to do with it, so I put it back in the box for another day.   Besides, I have plenty of projects laying around that need attention.


I opened another drawer and pulled out this Jacob's Ladder scrap quilt.  This quilt is so old it was the very first scrap quilt I started.  I recall how I had so much trouble putting all the non-matching reds next to each other.  At the time it seemed very stressful.   Fast forward several year, and I throw it all in!  The more the happier I am!  This quilt was put away only needing borders.  I do that quite frequently, and I am not sure why.  I had a perfect red for the first border and I already had the squares cut for the outer border.  Because my squares for the outer border didn't have much variety (remember this was my first scrappy quilt), I dug through my scraps for more selections.  I just have the bottom border to add and it will be ready to quilt.  I did not do a very good job with the red values for the center ring of the quilt.  A few of the lighter reds are lost.  It was a learning experience, so I will not be changing them.  The puzzling part is that I have about 50 4" finished half squares left over.  I wonder what my original plan was for them.  I'm not sure if I miscounted or if I intended for them to go somewhere.  I put them in the drawer for a different project.  It never hurts to have a few starters.
This pattern is from Fons & Porter Love of Quilting May/June 2000.  This quilt is old, but I did not start it in 2000!

Saturday, March 10, 2012

Short and Sweet Adventure

I had a little adventure to a yarn shop with Tina today.  We thought we were going to be shutdown when we arrived at our destination, and the shop was empty.  Never fear, they just moved and we have GPS.  It was worth the delay.  What's a good friend to do when there is StarBella  yarn on the line.  They had received a shipment recently.  Holy Cow!  I don't know how much they received but they didn't have much left.  What's a girl to do but take it all.  I even had to wrestle my friend Tina for the color I wanted.  Ok, we really didn't wrestle, but I took it right out of her hand because I wanted THAT color.  If she hadn't given it up so easily, I probably would have taken her out for it.  The shop had 3 other kinds of this type of yarn.  2 of which I had never seen before.

After the yarn shop, we were off to the quilt shop.  You know it is going to be a great day when you are greeted at the door with "Have you heard about our sale".  I bet she could see the excitement growing in my eyes. 
 The top fabric Tina talked me into.  She didn't have to talk too hard.  She invisioned a pillow case.  I invisioned a baby coin charity quilt.  I can't wait to dig into Char and Nancy's scraps for the coins.

See those great neutrals?  Those are for the next ISE group jelly flop swap!  They had a great selection of fabrics both sale and otherwise.  I had been on a quest for the perfect red to border my very old orange crush quilt with.  I finally found the perfect shade.  It was just patiently waiting for me to find it on the clearance table. 
Eleanor delivered all the quilt going to the Henryville, Indiana tornado relief.  Eleanor had 3 more, and Lorraine had one that is not pictured.  When I saw that Eleanor was donating her blue ridge beauty quilt that she just finished, I about flipped.  
She said that the collection site was very organized and everyone was very appreciative of our efforts.  Thanks to everyone that was able to contribute. 

Wednesday, March 7, 2012

Attic Window

This block is a little different than the block I normally see labeled Attic Window

Before you forget how to trim with the easy angle, let's do another one and practice again.  Once again, save those little triangles.

Color 1
  • 1- 2 1/2" square
Color 2
  • 2- 2" finished triangles (2 1/2" strip with the easy angle)
Color 3
  • 2- 2 1/2" x 4 1/2" rectangle
Color 4
  • 2- 4" finished triangles (4 1/2" strip with the easy angle)

Add the 2 1/2" triangles to both sides of the square

Trim the angles on the 2 1/2" X 4 1/2" rectangles like in Block 9

Attached these 2 pieces to the unit
 pin the color 4 triangles to the unit.  I like to sew with the triangle on the bottom.  If you enlarge the picture at the left, you can see that little square where the middle pin is.  That should be a 1/4" away from the edge, and that is where you want to sew.  Sewing right through that "X" will give you a perfect point on your block.


Tuesday, March 6, 2012

March Farming

Block #9
Let's start March with the Box block from the Farmer's Wife Book.  There are several ways to make this block.  I made it 3 different ways, and I will give directions for my favorite.  Make it the way you feel most comfortable.

Look closely at the illustrations below.  Line up the 2 1/2" line of your easy angle (2" line if you are using the Olfa frosted ruler like in the picture).  YOU MUST HANG THE RULER OVER THE EDGE 1/4" OR LINE UP THE BLUNT EDGE OF THE RULER. 

Don't throw those little triangles away!  You are going to need those in a couple months.  Trim them down to 1" finished half squares (use the 1 1/2" line on the ruler)  When we get to those blocks, you will already have them cut.

Color 1
  • 1- 2 1/2" x 6 1/2"
  • 2- 2 1/2" x 4 1/2"
  • 2- 2 finished half squares cut with 2 1/2" strip
Color 2
  • 8- 2" finished half squares (triangles cut with 2 1/2" strip and easy angle)


Look closely at the picture so that you can get the angles going the correct way.  It was really hard for me to line up that ruler like a right handed person.  Stack the 2 - 2 1/2" x 4 1/2" pieces right sides up and cut like illustrated.  Take the 2 1/2" x 6 1/2" strip and cut in the same manner.  Sew together the 2 - 2 1/2" (unfinished) half squares.  Check the measurements of your units.  I had to square mine up just a little.  


Press the 4 1/2" pieces to the right (One seam should face the red the other seam to the light

Press the half squares to the dark

Press the 6 1/2" piece to the light


Join the half squares with the 4 1/2" pieces; Press toward the half squares.


Join the 3 pieces to make the 6 1/2" block


One more done!

Friday, March 2, 2012

Pure Goodness

Is that even a word?  Several people asked how many jelly rolls can come out of 80 yards of fabric...the answer is about 20.  At least that's how many are lined up and ready to be swapped.  The theme was country colors, so there are quite a few reproductions in there. 


Lots of browns and greens

 Plenty  of neutrals to lighten it up
Even a few purples to go with the reds.  You know I like purple, so I can't do country without it.


I hope everyone likes the colors.  It was a really fun project for me to coordinate. 

March FW blocks will get posted this weekend.