
Monday, November 26, 2012
One Piece
Now I realize that I still need to give it a good press and add borders.....BUT....it is in one piece!! I love this quilt (even though it no longer matches my bedroom). I think I will put a 1" or 2" black border on it and then use green as my final border. Lets see how many years that takes. Perhaps it will match my bedroom again by then. These were all reproduction scraps from my stash except the red setting triangles.


Family Time
It was fabulous to have a little break from normal activities. The kids are already counting the days until Christmas vacation. I did manage to do a little sewing during the Thanksgiving break.
I put 2 borders on a signature quilt for Betty and made the backing. I think they complement all the signature blocks well.

 I resurrected these blocks from a container with determination of coming up with a layout and completion. The blocks will finish at 6". I ran out of the gold check, so I found a scrap of something else...didn't have enough of that, so I found a scrap of brown. It will be fun to see what scraps I can find for the backing. The pieces that were too small for the front will definitely make it on back.
 This heap of fabric made great progress this weekend too. It now ready for the 2 halves to be joined. I discovered that I can get a lot of pinning done while watching football. I am not sure why this didn't occur to me sooner. I guess it is time to dig out those long forgotten projects and get pinning.
I proclaimed this the year of finishing for me. I have finished several things, but I have a lot more to go. The push is on!!
I put 2 borders on a signature quilt for Betty and made the backing. I think they complement all the signature blocks well.

 I resurrected these blocks from a container with determination of coming up with a layout and completion. The blocks will finish at 6". I ran out of the gold check, so I found a scrap of something else...didn't have enough of that, so I found a scrap of brown. It will be fun to see what scraps I can find for the backing. The pieces that were too small for the front will definitely make it on back.
 This heap of fabric made great progress this weekend too. It now ready for the 2 halves to be joined. I discovered that I can get a lot of pinning done while watching football. I am not sure why this didn't occur to me sooner. I guess it is time to dig out those long forgotten projects and get pinning.
 I proclaimed this the year of finishing for me. I have finished several things, but I have a lot more to go. The push is on!!
Friday, November 16, 2012
Shipshe Retreat
I neglect to post about the Shipse retreat that was one month ago. How can that be? I accomplished so much and enjoyed being with everyone. I did bring my camera, but I never took any pictures. These pictures are all courtesy of Eleanor.


When I took a closer look- look at those amazing batiks! I had never seen anything like them before. I do admit - I have never found a stripe that I didn't like.
 Eleanor really liked this braid quilt. It might be a fun weekend project.


Diane Had several finishes at the retreat. Among them - the mystery quilt (that I still haven't finished), and a jelly roll race quilt
 Eleanor brought a couple finished project to display.
What a great idea to stitch baseballs with the snowball block.
 This tree was made by Jennifer. It was a lovely use of batiks. It was all paper pieced!!
 Nancy had her pile of completions. Her title of the speed queen still stands.
 Ruth finished this lovely string quilt. She did a great job of gradiation.


I was hard at work. I was using the Halloween pieces as leaders and enders while sewing the remaining blocks for an old project.

This quilt was so stunning from across the room. It was bought as a kit.

When I took a closer look- look at those amazing batiks! I had never seen anything like them before. I do admit - I have never found a stripe that I didn't like.


Diane Had several finishes at the retreat. Among them - the mystery quilt (that I still haven't finished), and a jelly roll race quilt

What a great idea to stitch baseballs with the snowball block.


Stacy was working on this beauty. I just love the colors she chose.
Last but not least. Eleanor and I. This is our tag team Jelly Roll Race quilt. I finished quilting it and sent it to her for binding. It is a donation quilt to the Cameron hospital.

- I pieced it
- She appliqued it
- I quilted it
- She bound it
- Donation complete.
Job well done!
I am looking forward to going again next year. I already have my calendar marked.
Wednesday, November 14, 2012
Temperance Tree

Cutting:
- 18 light AND 18 dark half squares that finish at 1" (1 1/2" strip with Easy Angle)
- 2 - dark squares 1 1/2"
- 1 - 4" finished dark half square triangle (4 1/2" strip with Easy Angle)
- 1 - 1 3/4" x 3 1/2" dark (I cut mine 4" for a little extra wiggle room)
- 2 - light triangles 2 1/4" strip cut with Companion Angle
Sewing:
- Make 18 half squares that measure 1 1/2"
- Sew the large triangles to both sides of the 1 3/4" x 3 1/2" rectangle. Line up the top of the triangle with the dark piece letting the dark color extend beyond the base of the triangles. Press toward the dark.


Sew the half squares together in pairs and the pairs together into 4 patches. I pressed all the seams open. Theses need to measure 2 1/2".
join the 2 - 4 patches at the left , and the 3 - 4 patches at the top
I am missing a few photos....because....I had my half squares going the wrong direction when I took the photos. I had to take my block apart and resew it. I know some only look at the photos, so I was afraid to include the photos with the triangles going the wrong direction.

Sew the joined 4-patches to the side of the 4 1/2" square and then add the larger section.
If you have any questions, just leave me a comment. I hope you block measures 6 1/2"
Next up - #79 Silver Lane
Tuesday, November 13, 2012
Nearly Finished
I have been working on my FW blocks, but it is really hard for me to get photos. I will keep trying.
I have also been trying to finish the twister runners that I put together at the Shipshe retreat.


Among my scraps were the leftovers from this quilt. I saw a pattern from a library book that I thought would work with what I had left. The solid fabric is scraps from my curtains. I thought it was cotton, but I think it was more of a twill. It had a lot of stretch. I found the perfect border fabric so the runner was started. And the backing was made with the scraps of the runner (the less than 2 1/2" X 6 1/2")
I managed to get it quilted while the kids were napping, and I started searching for the perfect binding. I found a 10" piece of the same binding as the other quilt. I need 9", so I can make it work. Time to be super careful cutting so I don't have any accidents.

 Here they all are- ready to bind. I am undecided on what color to bind some of the twisters with. I am hopeful when the sun comes up tomorrow I will be able to pick the bindings.
I have also been trying to finish the twister runners that I put together at the Shipshe retreat.


Among my scraps were the leftovers from this quilt. I saw a pattern from a library book that I thought would work with what I had left. The solid fabric is scraps from my curtains. I thought it was cotton, but I think it was more of a twill. It had a lot of stretch. I found the perfect border fabric so the runner was started. And the backing was made with the scraps of the runner (the less than 2 1/2" X 6 1/2")
I managed to get it quilted while the kids were napping, and I started searching for the perfect binding. I found a 10" piece of the same binding as the other quilt. I need 9", so I can make it work. Time to be super careful cutting so I don't have any accidents.


Sunday, November 11, 2012
Shopping Adventure
I can't remember the last time Tina and I went on a shopping adventure. It is probably a good thing that we don't go too often. They might post our picture with a warning at the checkout!!
I started the day with 2 exercise classes to get my energy level up. It definitely made the stink-o-meter go up if nothing else.
 I met up with Tina and my niece Ally, and we started the day at the CindaB warehouse sale. My girls had been wanting me to make them messenger bags. I ended up picking up 3 messenger bags, a horizontal tote and a beach bag. I am pleased to check the messenger bags off my list.
We made several other stops before heading to Defiance to look for more Denyse Schmidt goodness. After all, the clearance is 50% off at Joann's this weekend. Boy did we find clearance. The bolts were stacked about 15 high!! It was a two person adventure. One person lifted, and the other person pulled the bolt. I think my DS collection is almost complete for now. Needless to say the other shoppers were not very impressed with us.
 Isn't it a beautiful collection? As to what I am going to make with, I haven't decided yet. Everywhere I have looked over the past 2 weeks on the Internet, I have been seeing these fabrics and I just
 needed, obsessed about them. There are still a few prints that I don't have, but I don't think those ever made it to the clearance.
 I found the brown twig fabric and the black fabric at the Joann's clearance mountain. I don't know what it was about that black fabric, but I really liked it. The fabric on the right was the end of the bolt at a quilt shop. I love the color and design of it, but my DH thought it looked like his late grandmother's dress- LOL. He will like it once it is sewn into something.
Last night my husband asked me how much $$ I had invested in my stash. I responded with...."let's not think about that".
We picked up several more door prizes for the Christmas party and had a fabulous day. I made it home in time for the ND football game.
Today the plan is to mix up some cookies, spend time with the family, and perhaps sew a stocking and some FW blocks. Hmm...could I use those DS fabrics for a stocking? Probably so, but I am not ready to cut into them yet. They aren't properly aged.
Hopefully I will have something fun to post on Design Wall Monday.
I started the day with 2 exercise classes to get my energy level up. It definitely made the stink-o-meter go up if nothing else.
 I met up with Tina and my niece Ally, and we started the day at the CindaB warehouse sale. My girls had been wanting me to make them messenger bags. I ended up picking up 3 messenger bags, a horizontal tote and a beach bag. I am pleased to check the messenger bags off my list.
 We made several other stops before heading to Defiance to look for more Denyse Schmidt goodness. After all, the clearance is 50% off at Joann's this weekend. Boy did we find clearance. The bolts were stacked about 15 high!! It was a two person adventure. One person lifted, and the other person pulled the bolt. I think my DS collection is almost complete for now. Needless to say the other shoppers were not very impressed with us.
 Isn't it a beautiful collection? As to what I am going to make with, I haven't decided yet. Everywhere I have looked over the past 2 weeks on the Internet, I have been seeing these fabrics and I just
  I found the brown twig fabric and the black fabric at the Joann's clearance mountain. I don't know what it was about that black fabric, but I really liked it. The fabric on the right was the end of the bolt at a quilt shop. I love the color and design of it, but my DH thought it looked like his late grandmother's dress- LOL. He will like it once it is sewn into something.
Last night my husband asked me how much $$ I had invested in my stash. I responded with...."let's not think about that".
We picked up several more door prizes for the Christmas party and had a fabulous day. I made it home in time for the ND football game.
Today the plan is to mix up some cookies, spend time with the family, and perhaps sew a stocking and some FW blocks. Hmm...could I use those DS fabrics for a stocking? Probably so, but I am not ready to cut into them yet. They aren't properly aged.
Hopefully I will have something fun to post on Design Wall Monday.
Friday, November 9, 2012
Star Gardener
This was a fun block for me. I went with 2 basic colors, but I went scrappy within the colors. This is Block #87 from the Farmer's Wife Book
Light
 Sew together the 8 half squares. Press seams open and make sure they measures 1 1/2". Join the half squares with the squares to form a 4 patch. Press toward the 1 1/2" dark squares, and press the final seam open.
Join the 8 quarter squares with the remaining 16 triangles to form flying geese. I like to press the first seam toward the larger (dark) triangle and the second seam toward the smaller (light) triangle. Join the completed flying geese in pairs. I pressed the seam between the geese open
Lay out the 9 units and sew together to complete the 6 1/2" block.

I made this block a little differently than it is in the book. I substituted flying geese for half squares - which removed 8 seams.
Light

- 24 half square triangles that finish at 1" (1 1/2" strip cut with easy Angle)
- 1 - 2 1/2" square
- 8 - 1 1/2" squares
- 8 half square triangles that finish at 1" (1 1/2" strip cut with EA)
- 8 quarter square triangles cut from 1 1/2" strip with the Companion Angle
 Sew together the 8 half squares. Press seams open and make sure they measures 1 1/2". Join the half squares with the squares to form a 4 patch. Press toward the 1 1/2" dark squares, and press the final seam open.
Join the 8 quarter squares with the remaining 16 triangles to form flying geese. I like to press the first seam toward the larger (dark) triangle and the second seam toward the smaller (light) triangle. Join the completed flying geese in pairs. I pressed the seam between the geese open
Lay out the 9 units and sew together to complete the 6 1/2" block.

I made this block a little differently than it is in the book. I substituted flying geese for half squares - which removed 8 seams.
Thursday, November 8, 2012
Sawtooth #76
This one only has 22 pieces. Not too bad considering some of the others.
Cutting:

Lights:
1-4" finished triangle (4 1/2" strip cut with Easy Angle (EA)
9-1" finished triangles (1 1/2" strip cut with EA)
Darks:
1- 6" finished triangle (6 1/2" strip and cut with EA)
11-1" finished triangles (1 1/2" strip cut with EA)
Couple things: Don 't pay attentions to my extra white triangles. I already had the squares sewn, so I had to un-sew 2 pieces. Also - I tried adding the extra 2 dark triangles on the ends before joining with the large white triangle, and it didn't work well for me. I would recommend adding them like the instructions say not the pictures.

Sew 9 of the extra small triangles together to make 1 1/2" squares. Angie found it helpful to cut her strips 1 3/4" and square up the units to 1 1/2" after they were sewn. sew the units together in pairs, then join the pairs. Add the remaining half square to one of the units. I pressed these seams open.
Pin and sew the shorter unit to the shorter edges of the light triangle. Press toward the light triangle. Now pin and join the longer unit to the other short side of the triangle. Press this seam open.
 Add the remaining 2 dark triangles to the left and right side. This unit should be the same size as your dark large triangle. Join the 2 pieces along the long edge to make a 6 1/2" square.
I sort of feeling like I am cheating on these. Char gave me a mountain of triangles. I sewed them together in one setting, now I am squaring them up and using them for 1 1/2" squares. Thanks Char! I love your leftovers. I wish I could convince my kids leftovers were the best. I bet they will understand someday that leftovers mean all the had work has been done.
I am working on 2 more blocks today (#87 Star Gardener, and #95 Temperance Tree), so check back tomorrow for more instructions.
Words of wisdom for today: Never leave a bone in the sink and leave your dog unattended. He can be a sneaky fellow when I go to the basement to sew. The light bulb should have come on when he didn't follow me down the steps.
The sun is shining, supper is in the crockpot, and I have wine tasting tonight at the library. It's been a good day.
Cutting:

Lights:
1-4" finished triangle (4 1/2" strip cut with Easy Angle (EA)
9-1" finished triangles (1 1/2" strip cut with EA)
Darks:
1- 6" finished triangle (6 1/2" strip and cut with EA)
11-1" finished triangles (1 1/2" strip cut with EA)
Couple things: Don 't pay attentions to my extra white triangles. I already had the squares sewn, so I had to un-sew 2 pieces. Also - I tried adding the extra 2 dark triangles on the ends before joining with the large white triangle, and it didn't work well for me. I would recommend adding them like the instructions say not the pictures.

Sew 9 of the extra small triangles together to make 1 1/2" squares. Angie found it helpful to cut her strips 1 3/4" and square up the units to 1 1/2" after they were sewn. sew the units together in pairs, then join the pairs. Add the remaining half square to one of the units. I pressed these seams open.
Pin and sew the shorter unit to the shorter edges of the light triangle. Press toward the light triangle. Now pin and join the longer unit to the other short side of the triangle. Press this seam open.

I sort of feeling like I am cheating on these. Char gave me a mountain of triangles. I sewed them together in one setting, now I am squaring them up and using them for 1 1/2" squares. Thanks Char! I love your leftovers. I wish I could convince my kids leftovers were the best. I bet they will understand someday that leftovers mean all the had work has been done.
I am working on 2 more blocks today (#87 Star Gardener, and #95 Temperance Tree), so check back tomorrow for more instructions.
Words of wisdom for today: Never leave a bone in the sink and leave your dog unattended. He can be a sneaky fellow when I go to the basement to sew. The light bulb should have come on when he didn't follow me down the steps.
The sun is shining, supper is in the crockpot, and I have wine tasting tonight at the library. It's been a good day.
Wednesday, November 7, 2012
Checkerboard - Extra (or substitution)
I thought the postage stamp block was fun. I enjoyed picking 36 different fabrics. If you want to make an easier version, go with the checkerboard block.
 Cutting:
1 dark and 1 light
1 1/2" x 28 1/2"
Sew the 2 strips together and press toward the dark. It should measure 2 1/2". Cut the strip into 3 pieces about 9 1/2" long.

Sew the 3 sections together press toward the dark after each addition

 Cut the joined pieces into 6 - 1 1/2" segments.
 Join the 6 segments to complete the 6 1/2" checkerboard block.
 Cutting:
1 dark and 1 light
1 1/2" x 28 1/2"
Sew the 2 strips together and press toward the dark. It should measure 2 1/2". Cut the strip into 3 pieces about 9 1/2" long.

Sew the 3 sections together press toward the dark after each addition

 Cut the joined pieces into 6 - 1 1/2" segments.
Sidetracked?
I didn't intend to stay away so long. The retreat was incredibly fun and I made some new friends. It is hard to believe that was almost a month ago. I am going to work really hard at getting caught up on the Farmer's Wife in the next week. I don't want you to think I abandoned you!!


 Now that you have 9 - four patch units, join the 4 patches in rows and then sew the rows together.
Let's start with and easy one - # 68 postage stamp
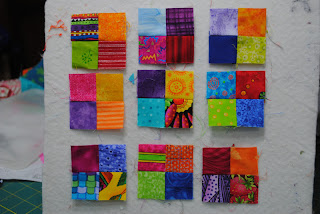
This one is so easy, you probably don't need instructions. Traditionally postage stamps are all different fabrics, but you can do your however you like

Cutting:
36 - 1 1/2" squares.
Arrange the 36 squares in a 6 X 6 grid.
Sew the squares together in pairs, and then join in 4 patches. Some like to put these together in rows, but I prefer 4 patches. I always press odd number rows to the right and even to the left.

Checks the size of the 4 patches - Should measure 2 1/2" at this point. It is better to check it here so you don't have a surprise at the end.

 Now that you have 9 - four patch units, join the 4 patches in rows and then sew the rows together.
Little pieces, simple construction.
Subscribe to:
Posts (Atom)